Production Certificates With Autocert
In this tutorial, you’ll add production certificates with Autocert to your Pomerium instance.
Make sure you’ve completed the following tutorials:
- Get Started
- Build a Simple Route
- Build a Simple Policy
- Identity Verification with JWTs
- Build Advanced Policies
- Build Advanced Routes
- Build TCP Routes
- Self-Host Pomerium
Each tutorial builds on the same configuration files. In this tutorial, you’ll learn how to enable Autocert to manage TLS certificate automation for your upstream services.
About Autocert
To understand Autocert, it helps to understand one of the problems it solves:
The Problem
If you installed Pomerium in a VM instance, the default configuration file includes certificates keys where you can import your own certificates to secure the connection from Pomerium to the upstream service.
If you don’t include certificates, Pomerium will generate self-signed certificates to secure these connections for you.
However, a self-signed certificate will prompt your browser to throw a self-signed certificate warning. To avoid this warning, you need to import and manage certificates yourself.
But, managing your own certificates can be tedious and difficult to maintain (especially as your services and routes scale).
The Solution
Fortunately, Pomerium has an Autocert setting that, when enabled, allows Pomerium to automatically retrieve, manage, and renew public-facing TLS certificates from Let's Encrypt.
(If your OS trusts the ISRG Root X1 certificate, it will validate Let’s Encrypt certificates, too.)
To be clear, Autocert enables Pomerium to generate per-route certificates that authenticate the upstream server and secure the upstream connection. This means you won’t encounter the self-signed certificate warning when you access a route.
Autocert does not secure the downstream connection (that is, the connection between the client and Pomerium).
How Autocert works with Pomerium
The Autocert setting relies on the Automatic Certificate Management Environment (ACME) protocol to automate the issuance and verification of certificates between a Certificate Authority (CA) and a user’s server (also known as the “applicant”).
We implement Autocert with Let’s Encrypt, which functions as the CA.
Your domain is the applicant.
Let’s Encrypt uses the ACME protocol to verify that you own a domain before it issues you a certificate for it. To verify that you own a domain, you need to satisfy one of the following challenges:
(There are other challenges, but Pomerium only supports these two for now.)
After satisfying either of these challenges, Let’s Encrypt – and, in turn, Autocert – will retrieve, manage, and renew certificates for your domain.
Configure Autocert
Configuring Autocert is simple. In your configuration file, comment out or delete the certificates keys. Replace them with the autocert setting:
# certificate settings: https://www.pomerium.com/docs/reference/certificates.html*
autocert: true
# REMOVE FOR PRODUCTION*
# If you're using mkcert to test Pomerium locally, comment the autocert keys and uncomment*
# the keys below, adjusting for your mkcert path:*
# certificate_file: /home/user/.local/share/mkcert/rootCA.pem*
# certificate_key_file: /user/me/.local/share/mkcert/rootCA-key.pem*
Run Pomerium
Now, run Pomerium to see if Autocert worked.
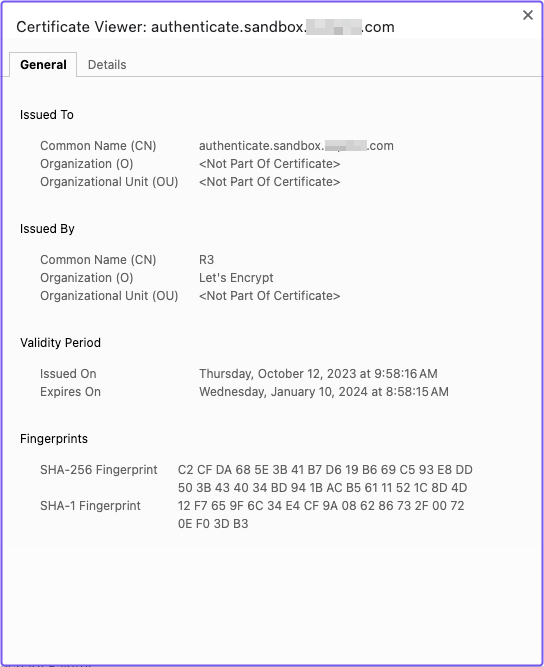
Select the Verify route. Now, click the padlock icon and view the certificate.
You should see your domain in the Issued To > Common Name (CN) field (the UI will vary depending on your browser, but you get the idea):
That’s it! You configured Pomerium to manage certificates for your upstream applications.
Summary
Now that Pomerium is running on a VM with Autocert managing certificates, you have a fully functional reverse proxy for your access control needs.
With Pomerium’s setup complete, you’re ready to start adding and securing your own services behind Pomerium.
Head to our final tutorial, Putting It All Together, to see what you should do next.